WIN Career Readiness System: Batch Enrollment
Step 2b: Data Validation and Submission
Batch Enroll Troubleshooting Guide
Select Import File Troubleshooting
Mapping Fields Troubleshooting
Editing Records Troubleshooting
Using a Non-Template File for Import
Enrolling into Multiple Organizations with One File
Assigning New Enrollees Directly to a Class in the System
Leaving and Returning to an In-Process File
Introduction
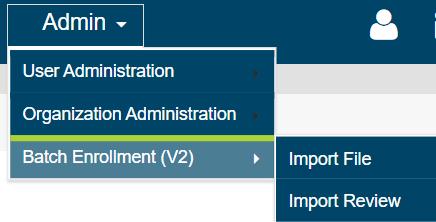
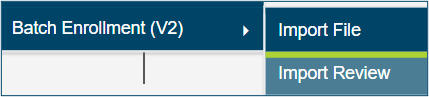
Welcome to the new Batch Enrollment system! Access the new Batch Enrollment tool from the Admin menu on your dashboard. You will notice the Batch Enrollment process now has two parts: 1) Import File and 2) Import Review.
First, we will walk you through the ideal Batch Enrollment process – one with no errors. Later on in these instructions, there will be a troubleshooting guide.
Step 1a: Import File
Selecting Import File from the Administration > Batch Enrollment (v2) menu will take you to the first page of the new batch enrollment process. Start by clicking the blue Download Template button. This will generate a CSV template with all the correct column headings already listed across the top, ready for you to fill in with your learners’ data. If you want to view data requirements and definitions at any time, select the Field Definitions button.
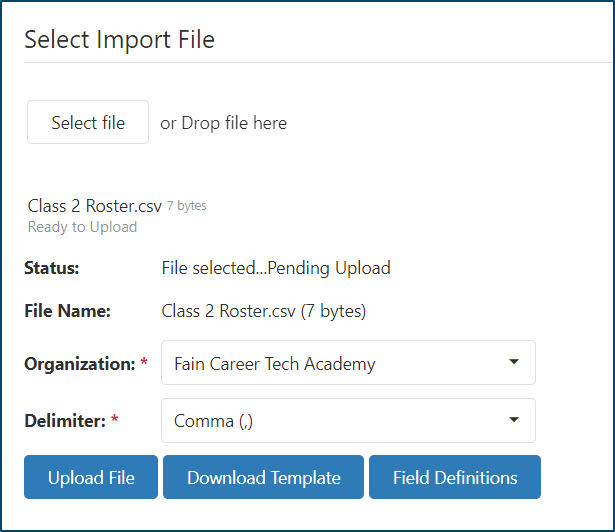
Once you have filled out your template with your learners’ data, you can use the Select File button or drag and drop your file to the Import File page. Please verify that your file format has not changed from .csv. Next, check to see that your Organization is selected (this is important for administrators who may have more than one school or location where learners can be enrolled.) The Delimiter will default to Comma for CSV file types, like the template, so it does not need to be changed. Then, click Upload File.
Step 1b: Map Fields
Once you have clicked Upload File, the Map Fields section of the page becomes active. Depending on your screen size and settings, you may need to scroll down to see the Map Fields section.
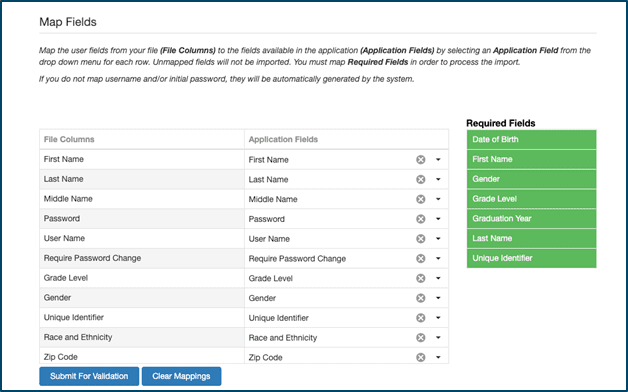
Mapping fields simply means you are telling the system where to put the data from each of your File Columns from your uploaded file. The system will auto-map file columns with headers that match the Application Fields. Since your template headers directly match the application fields, they should all auto-map, but if you are having trouble with this step, see the Mapping Fields Troubleshooting section below.
Notice the required fields will all turn green when they have been mapped, and the Submit for Validation button will become active.

Once your file is ready and all fields are mapped, select Submit for Validation and you will be transitioned to the Import Review page automatically.
Step 2a: Import Review
On the Import Review page, you will review a summary of your file and complete the enrollment process. If you have just been transitioned from the Import File page, your recently imported file should automatically load into the Review panel with details telling you which records passed validation successfully and which have errors that require correction before enrollment. Depending on your screen size and settings, you may have to scroll down to view the File Summary and Import Review Table.

Step 2b: Data Validation and Submission
If you filled out all the Batch Enroll Template data correctly, you should see “Validated Successfully” in the Status column for all records, but you are not done yet. You must still submit your records. (Validation failures and how to fix them will be discussed further under the Validation Troubleshooting section below.)
Once all your records have been successfully validated, click the Select All box at the top of the record selection column, then click the bold checkmark above the Row Actions (between the trash can and the refresh button). Alternatively, select a check box(s) for an individual record(s), and then the check mark in the row if you do not wish to import the entire file.

IMPORTANT: After selecting the record(s) and clicking the checkmark, be sure to click the now active Import Pending Records button just above the list of records, to complete the enrollment process for all learners who have been validated successfully.

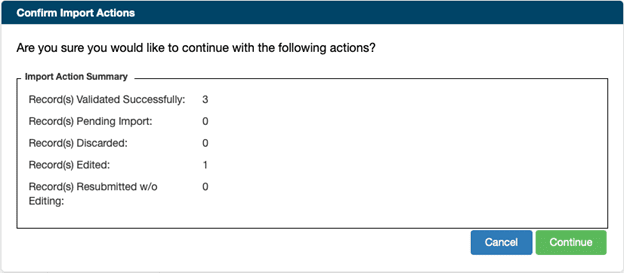
Once you click Import Pending Records, button you will see a summary of changes and will be asked to confirm the enrollments. Clicking Continue will import all valid records and save all pending changes.
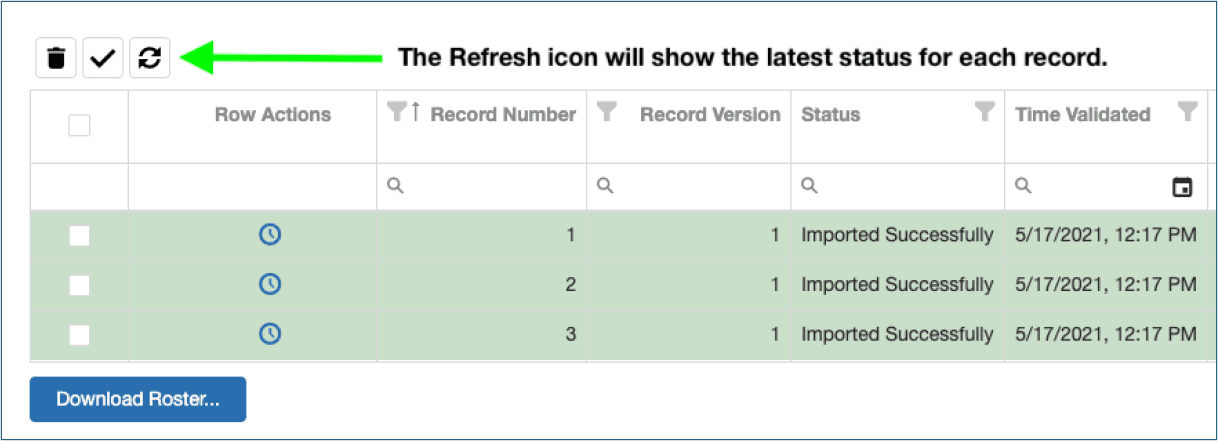
Back on the Import Review page, clicking the Refresh icon above the Import Review table will show the latest statuses. When all records are imported successfully, the rows turn green, and the Status reads “Imported Successfully.” Depending on the number of records, you may need to click the refresh button more than once for all record rows to turn green.
From this page you can now download a roster of the students who were successfully enrolled, and there is an option to include passwords in the roster. Note that you must select Save to finish the enrollment process before downloading your roster.


That’s it! Your learners should all be enrolled now and ready to get started. If you ran into issues during the Batch Enrollment process, continue on to the Troubleshooting guides below.
Batch Enroll Troubleshooting Guide
Import File Troubleshooting
If you are having trouble with steps 1a and 1b, see the troubleshooting instructions below.
Select Import File Troubleshooting
If you are having trouble with selecting a file for import, make sure that you are trying to import the recommended file type: CSV. Other file types are supported, but XLS (Excel) file types are not supported. For the best experience, we recommend downloading the template and viewing the Field Definitions before attempting to upload your file.
Mapping Fields Troubleshooting
File Columns from your data file that do not match (or nearly match) their corresponding Application Fields will need to be mapped so that the system knows where to record your data. Depending on your screen size and settings, you might have to scroll down INSIDE the Application Fields box to view all mapping opportunities.
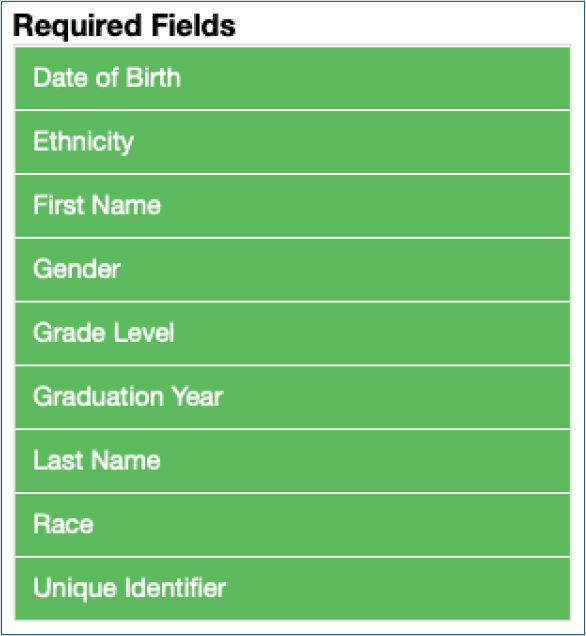
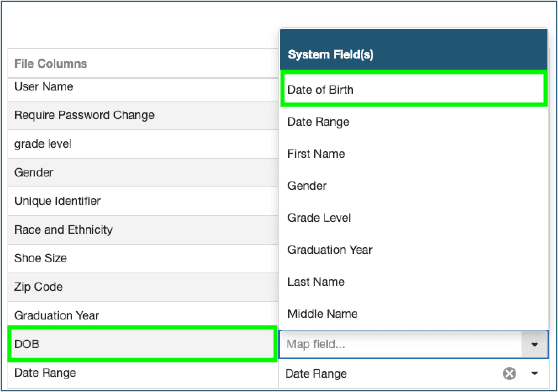
In the following example, notice the system will recognize “grade level” as “Grade Level” in the application even though it is capitalized differently, but the date-of-birth header in the File Columns is “DOB” which needs to be mapped to the “Date of Birth” Application Field. Note that Date of Birth is listed under Required Fields. It will not turn green in that list until it is mapped. The Submit for Validation button will remain inactive until all required fields are mapped.

If you do not map username and/or initial password, they will be automatically generated by the system.
Other unmapped fields will not be imported. For example, if you add a column labeled "Class" but do not map it to Venue, the learners from your file will still be imported but they won’t be associated with the designated class from your original file without the necessary mapping.
If all your fields are mapped correctly but some of your required fields have not turned green, that means that those columns are completely absent from your original file, and you will have to add them and start over by re-uploading a new file with all required field information added. We recommend downloading and using a template from the Import File page to make sure you have all required fields included in your file.
Import Review Troubleshooting
If you are having trouble with steps 2a or 2b, continue to the troubleshooting instructions below.
Editing Records Troubleshooting
It is common for a file to have one or more errors during import. The example below shows three records that were validated successfully and one record that was validated with errors. The Import Review Table will allow you to edit the record before submitting for enrollment using the Save button.


The tools in the Row Actions column allow you to edit (pencil icon), discard (bin icon), submit (bold checkmark), and view history (clock icon) for each record.
As previously instructed, for records that have Validated Successfully, click the checkmark to indicate you would like to import that learner. When you click Save, the learners will be successfully enrolled.
If a record needs editing due to a validation error, selecting the small triangle in the Row Actions column will expand the row to show the error messages.

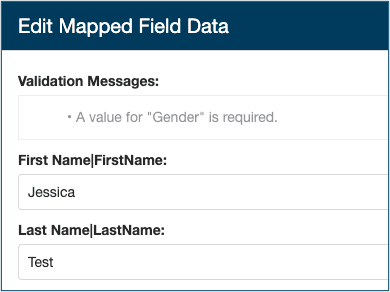
Select the pencil icon on that row to open the system editor and make changes to your data. The Validation Messages dialog box at the top will remind you of what needs to be edited.
Input or change any data that the system will not accept, and select Save inside the editor. Remember, there are Field Definitions available to help determine what the system will accept.
Once you have edited all records with errors, use the Save button at the bottom of the Import Review Table to submit the records with edits.

Here is an example of the most common errors:
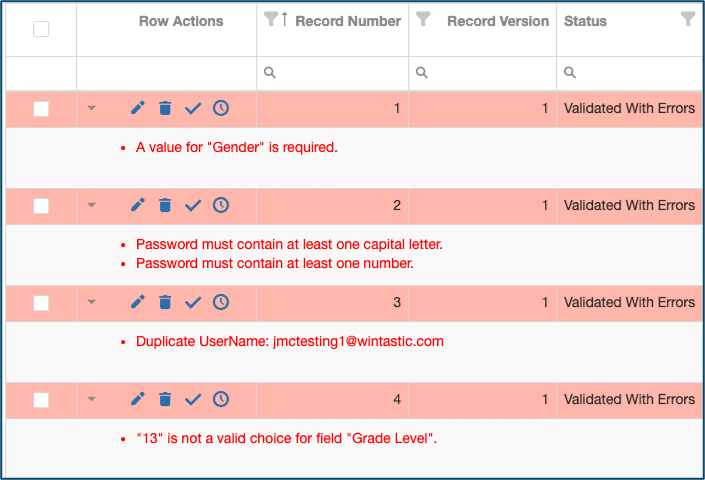
If a cell for a required field has been left blank, the system will tell you that it is required. If a password does not meet the security requirements, you will be prompted to update that. If a username already exists in the system, you will receive the “Duplicate UserName” error. If you input data that is not accepted by the system for a given field, it will say that your data is not a valid choice.
If you receive an error similar to the one shown below (it might say Student instead of Learner), it means that you did not select your destination organization in Step 1a.

For further assistance with Batch Enroll, you can contact WIN Learning Support at 888-717-9461, Option 3 or support@winlearning.com.
Import Review Definitions
Record Number – Identifies which record from the uploaded file it is
Record Version – Identifies which version of the record it is based on number of edits
Time Validated – Timestamp of when the record validated successfully
Time Imported – Timestamp of when the record imported successfully (student enrolled)
Status – Current state of the record in the enrollment process. Possible statuses include:
Validated Successfully – Data looks valid
Validated with Errors – Data issue identified
Pending Validation – Record is waiting for the system to perform validation
Edited and Resubmitted – Data edited and resubmitted for import
Discarded – User has chosen not to import the record
Pending Import – Record is waiting for system to import the record
Imported Successfully – Records imported successfully. Student(s) enrolled
Errors During Import – Record could not be imported due to an error
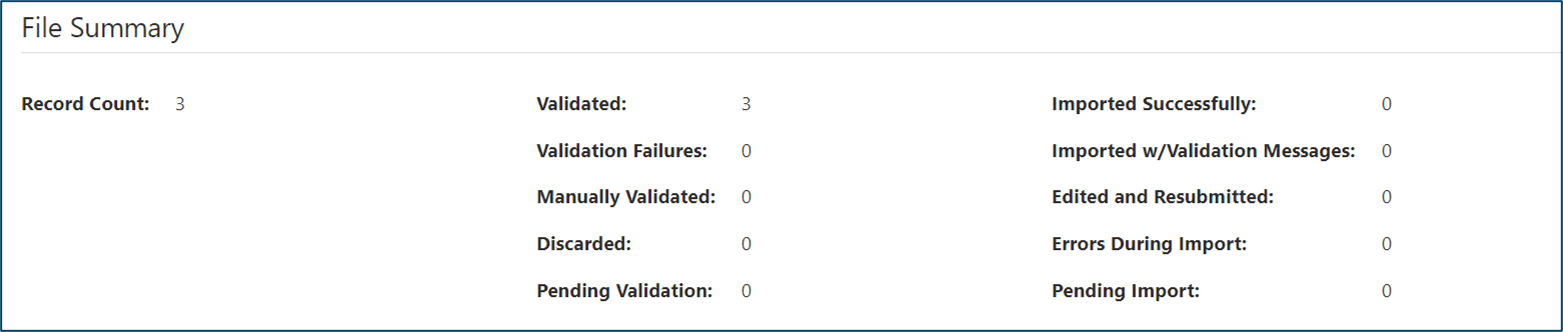
File Summary – Shows how many records were in the file, how many failed to import, how many are pending, and how many were imported successfully
Enhancements
Using a Non-Template File for Import
You are no longer forced to download and import from a template file. You can use a pre-existing data file as long as it is saved as a .csv file type and includes all the required application fields. Other file types are supported, but CSV is recommended. Note that .xls files are not compatible with the system and will generate an error if attempting to import.
Enrolling into Multiple Organizations with One File
Administrators above the organization level (such as district-level administrators) now have the option to batch enroll into multiple sites/schools with one file. If you want to enroll to multiple organizations, first add a column to your file that is titled “Organization Name”. Then, list the name of the organization (school, site, etc.) to which you are enrolling students exactly as it appears in Organization Administration inside the WIN Career Readiness System.
To view your class names, go to the Admin menu on your dashboard > Organization Administration > Manage Organizations. Select your organization type from the dropdown at the top, select Show All, and your organization names will appear below.
Assigning New Enrollees Directly to a Class in the System
You can now enroll directly into classes with a similar method. Just add a “Venue Name” column to your file, and list the class to which the learner should be assigned in their respective row. You can only assign each learner to one class. If you have a group of learners who need to be assigned to one class and another group who needs to be assigned to another class, make sure you put the correct class name in the Class column for each learner. Note: you must use the exact class name from Class Management for this to work, and it will only apply to classes that have already been created in the system.
To view your class names, go to the Admin menu on your dashboard > Organization Administration > Class Management then select your organization from the dropdown on the left panel and your class names will appear below.
If you choose to add a “Class” column to your file to directly assign your students to a class, then you will map “Class” to “Venue Name” when mapping fields.
Leaving and Returning to an In-Process File
If you need to leave and come back to review your file after you’ve imported it, you can return to Import Review from the Admin > Batch Enrollment menu.
If you left and returned, you will have to click the blue Select File button and select the file that you previously imported that still needs review, and then select Load File.